
Equipment Manual
SUTHERLAND® 2000™ Rub Tester
Model SR-500
Operating procedure, test methods, rub chart and heated weight details for the SUTHERLAND® 2000™ Ink Rub Tester.
Description
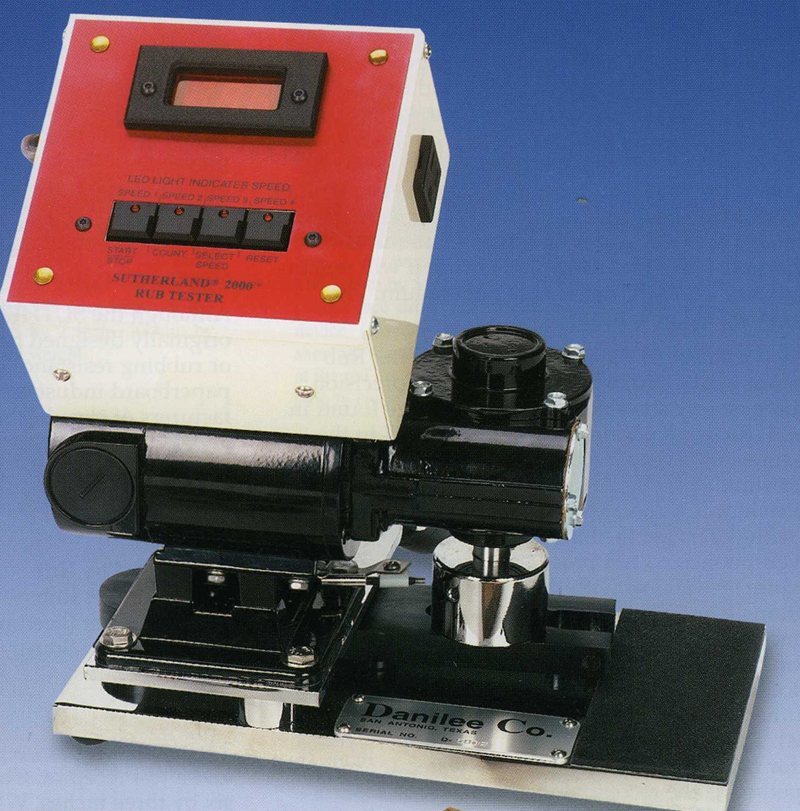
The tester is a motor-driven instrument for moving a weighted test strip over a printed specimen through an arc. The SUTHERLAND® Ink Rub Tester, the industry standard for decades, has recently undergone some significant changes to enhance its utility and reliability. Combined with a new ASTM (American Society for Testing and Materials) recommended practice for its use, the Tester is an excellent position to enjoy even more widespread use in the coming years. The result of this work is an affordable abrasion-testing instrument that retains all the features that made it an industry standard plus improvements that ensure it will remain the industry standard in the new millennium. The cover shows the new tester.
In 1990 the stroke of the SUTHERLAND® Ink Rub Tester was shortened, which increased the precision and more closely simulates abrasion damage found in the field. Research and other published work in the print-abrasion-testing arena have shown that quick strokes simulate some types of rub damage (most notably shipping damage). One of the biggest problems with the use of the Sutherland had been the lack of a well-publicized test procedure for its use. While a procedure is available with the instrument, there was no nationally available method that could be readily referenced. This has now been corrected with the introduction by ASTM of ASTM D-5264 – 92, “Standard Practice for Abrasion Resistance of Printed Materials by the Sutherland Ink Rub Tester” (copies available from ASTM). This method is spelled out the proper procedure for using the SUTHERLAND® Tester. Included in this method is the recommendation to use standard “receptors” of known abrasiveness when conducting a test.
The SUTHERLAND® 2000™ motor now has four speeds; the first speed (21 cycles per minute) is half the speed of the older models; which will make the “wet” tests, and tests using under 5 strokes easier to perform. The second speed (42 cycles per minute) and third speed (85 cycles per minute) are the same as the older models, while the fourth speed (106 cycles per minute) is faster. These new improvements will allow the customer the ability to customize the testing procedure more to their individual product, yet maintaining the ability of duplicating a procedure used by someone with an older model unit. The higher speeds will reduce the long test times needed for certain types of substrates (plastics, UV varnishes, printed films, etc.).
The SUTHERLAND® 2000™ incorporates a digital counter with a fiber optic sensor to ensure the accuracy of the number of rubs for a given test. Simply enter the number of rubs desired and the instrument will shut off automatically after the correct number of strokes. Changes to the control board programming will now allow the unit to stay on for 60 minutes before automatically turning off the LED display. Also, after the display has turned off, pressing any button will automatically display the last number of strokes entered, allowing time to record results without having to hold down the count button and reenter the strokes with each test.
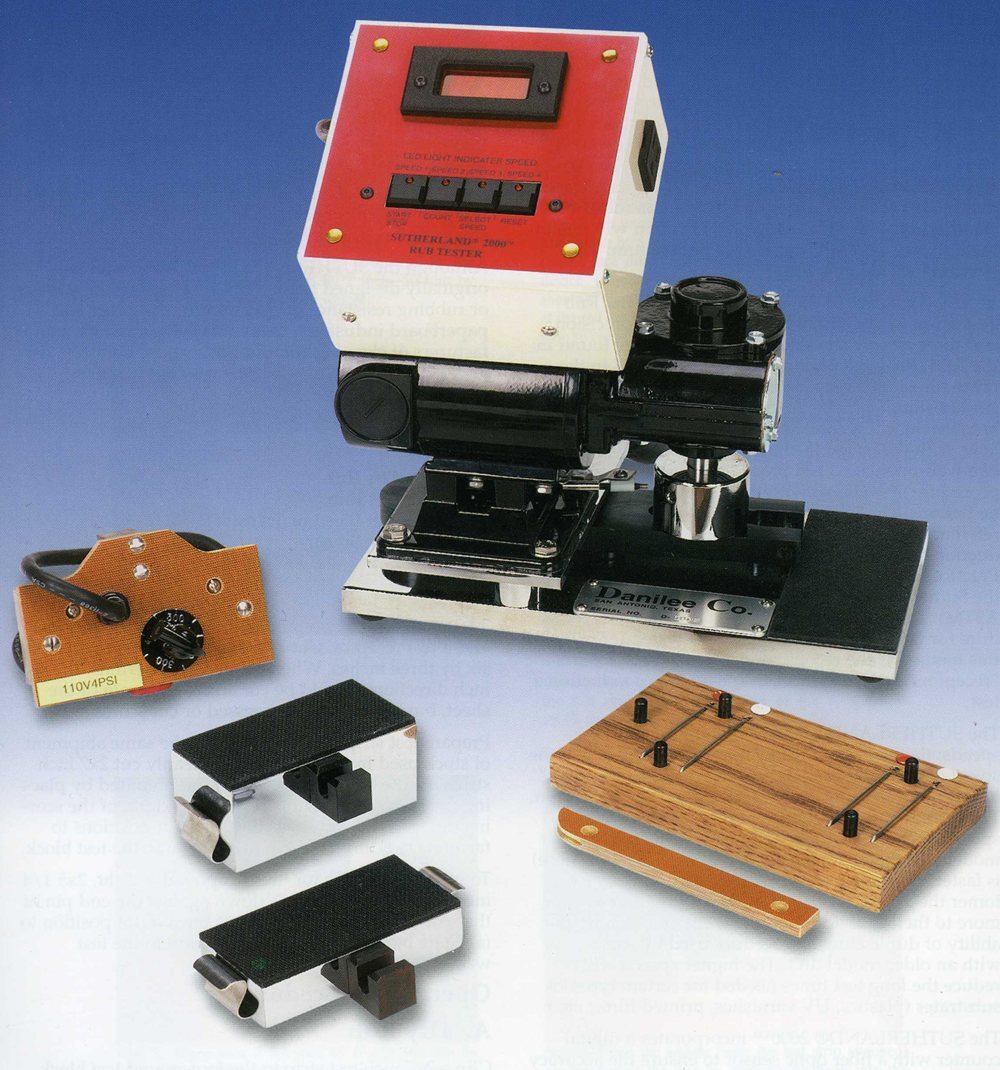
A single mounting pad for the test strip is cut to fit the weight. It was found by using a two-inch (5cm) by four-inch (10cm) pad on the bottom of the weight that precision of the test increased. Two-pound and four-pound weights and scoring fixture are included.
A supply of 80 x 80 count bleached muslin cloth (cloth not included) has been found useful in testing wet smear, wet rub, and wet bleed.
Although the SUTHERLAND® Ink Rub Tester was originally designed to fill a need for testing the scuffing or rubbing resistance of inks used in the paper and paperboard industries; today it is being used by manufacturers of cleaning compounds, waxes, floor tile, film and many other items. The test results are reproducible.
The following tests may be made with the instrument:
Test Specimen
The test requires two pieces of stock, the test specimen and a test receptor. Cut a test specimen, approximately six by three inches. When printed area permits, the six-inch directions should be cut across the grain of the sheet, but must not cross pressed or cut scores.
Prepare test strips of material from the same shipment of stock used in the test sample. Cleanly cut 2x7 inch strips for the four-pound weight are prepared by placing the strip face down against the end pin of the scoring device and scoring at the white dot positions to facilitate bending the strip to conform to the test block.
To prepare samples for the two-pound weight, 2x5 1/4 inch strips are placed face down against the end pin of the scoring device and scored at the red dot position to facilitate bending the strip to conform to the test weight.
Operating Procedure
A. Dry Rub
Clip a 2x7 inch test strip to the four-pound test block, with the abrasive surface away from the rubber pads. Mount the test specimen securely (if printed material, mount with printed side up) on the rubber pad of the base plate.
Using a camel-hair brush, brush the test strip and the test specimen thoroughly before starting the test to remove any dust or foreign material. Place the weights over the sample, making sure that the 2x4 inch rubber pad of the test block is over the area being tested, that both surfaces are free of dirt. Preset the tester for ten strokes, or for any number of strokes selected as standard for a particular surface.
- Plug in the power cord to the correct voltage, the display will read a version number such as 1-0. If the machine is already plugged in, touching any key will reactivate the display to whatever the previous setting was. For all speed 1, low count rub tests, cycle machine one time to allow the machine to reset for exact stroke.
Note: If you leave the machine sit idle, after approximately 60 minutes it will automatically turn the display off.
- COUNT BUTTON. Each time the COUNT button is pressed the displayed cycle counts will increase by one. When the COUNT button is held down, the counts will increase each 1/2 second. When the count reaches 10, it will start incrementing by 10’s. When the count reaches 100 it will start incrementing by 100’s. Anytime the button is released, the process will start over. (i.e. ones, tens, hundreds) While the motor is running the COUNT button is deactivated and “count” adjustments can not be made. Maximum count is 999. Press “Reset” to remove the count number readout. If the motor is running, pressing reset will also stop the motor and remove the count number to 000.
Note: When adjusting the cycle count, the displayed value is the starting point, not the cycle count previously set. If the cycle count is 100 and the motor is started and then stopped at 95, pressing the COUNT button will set the cycle count to 96.
- START AND STOP BUTTON. This controls the starting and stopping of the motor. After the count has reached 0’s, the motor will stop and after a short delay the display will reset back to the number that was displayed at the time of the last start cycle. If the motor is running when the START/STOP button is pressed, the motor will stop. The display is not cleared. Pressing START/STOP will start the motor again and the count will continue from the point at which the motor was stopped.
Note: The motor will not start if the display reads 0’s.
- MOTOR SPEED BUTTON. Pressing the SPEED button will increment the motor through speeds 1-4. The speed is indicated by one of the four LED’s lights. The speeds available for testing are: Speed 1 (21 cycles per minute), Speed 2 (42 cycles per minute), Speed 3 (85 cycles per minute), and Speed 4 (106 cycles per minute). When the machine is first plugged in it will automatically default to slow speed (i.e. Speed 1) unless you press the SPEED button. The motor’s speed may be changed at any time, before starting the motor or after it is running. The speed of the motor is retained when the “Reset” button is pressed, to change the speed press the SPEED button.
- RESET BUTTON. This button will reset the count of the board. When pressed, the display will reset to 0’s. If the motor is running, the motor will shut off. This button may be pressed at any time.
When the rub has been completed, examine both the test strips for signs of transfer. The two pieces should be stapled together and used for visual reference and interpretation. They should be marked plainly with the number of rubs given. Place the test block on its side after using; do not place it on the machine or lay it on the rubber base.
B. Wet Rub
Mount the strips in the same manner as for dry rubs, using the two-pound test block. Preset the tester for one rub. Place three to six drops of water on the printed surface so that they will be covered by the test block. Place the block in position and immediately press the “start” button. After one stroke, examine both surfaces for color transfer. Repeat single strokes until ink failure is noted or the surface of the sample shows fuzz or abrasion.
C. Wet Bleed or Transfer
Mount a 2x5 1/4-inch strip on the two-pound test block with the felt or smooth side out, and saturate the blotter with water (an eyedropper is convenient). Place the wet blotter on the sample to be tested and leave in place for four minutes. Remove the block without rubbing and examine for ink transfer to the blotter.
D. Wet Smear
Use a water-saturated blotter on the two-pound block and actuate the tester for one stroke. Examine the blotter for color transfer. In cases where extreme water resistance is required, more rubs may be specified. An alternate procedure consists of mounting a 2x6-inch piece of 80x80-count bleached muslin on the two-pound test block over a blotter as specified above. This procedure has been found particularly useful since it eliminates the effects of surface abrasion on the blotting paper.
E. Functional Rub
Functional Rub is a term of embracing a number of miscellaneous uses for the SUTHERLAND® Ink Rub Tester. An ink, which is acceptable under the outlined test procedures, may fail under exposure to foreign liquids or pastes. For example, certain inks might be tested to conform to specifications such as “one rub, cod liver oil” or “three rubs, Jones Antacid Toothpaste”.
In reporting functional rubs, the operator must specify the number of rubs, the time of contact before rubbing, and the special conditions and testing mediums employed.
Evaluation of Tests
A practical approach should be emphasized in test evaluation. Few, if any, inks will pass rubbing, wet or dry, without a slight transfer of color. Decisions on the suitability of ink are best made by running comparative tests, checking an acceptable sample at the same time and under the same conditions.
A quantitative method of evaluating samples for rub damage has been developed. The test strip (receptor) is measured (zeroed) with a densitometer or a spectrophotometer before the rub test. After the test, the strip is measured again with either the change in density (densitometer) or delta E (CIE L*a*b* spectrophotometer) reported. The larger the number, the greater the rub damage.
Consideration must be given to the time interval between printing and testing, particularly with slow-drying inks. Also, prints should be protected from dust and dirt between printing and testing.
An attempt should be made to use test samples which are representative of the run, i.e., eliminating the use of sheets with excessive anti-offset materials, or sheets taken from the top of a load which may have collected dust or foreign material.
New Rubber Pads
The pads should be changed when they become hard or damaged from age and use. Recommendation is a six (6) month minimum. These can be ordered from DANILEE COMPANY. To replace pads, clean metal surface with solvent such as naphtha. Remove protective back from pressure-sensitive surface. Press this surface to the metal in the proper location.
Rub Chart
| Test | Size of Test Strip Block (Inches) | Suggested No. of Strokes | Strip Material | Contact Time Before Rub |
|---|---|---|---|---|
| Dry Rub-Ink | 4 lb. 2 x 7 | 10 | test sheet | 0 |
| Dry Rub-Varnish | 4 lb. 2 x 7 | 25 | test sheet | 0 |
| Wet Rub | 2 lb. 2 x 5¼ | * | test sheet | 0 |
| Wet Bleed | 2 lb. 2 x 5¼ | 0 | Std Blotter | 4 min. |
| Wet Smear | 2 lb. 2 x 5¼ | * | Std Blotter or Muslin | 0 |
*Repeat one-stroke rubs until sample fails.
Heated Weight
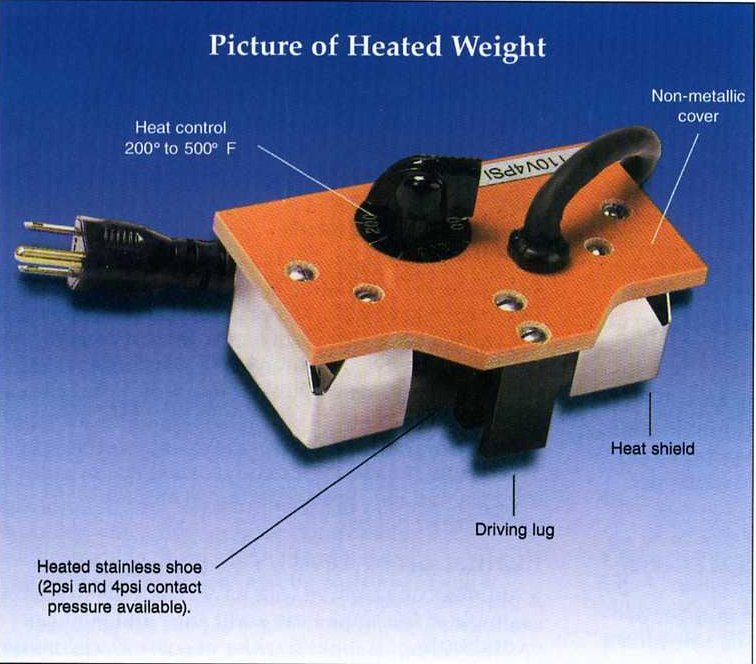
Designed for use with the SUTHERLAND® Ink Rub Tester. This heated weight provides a uniform test for evaluating the “hot abrasion” resistance of printed cartons, labels, and periodicals. Where required, rub resistance specifications may now be based on number of strokes at a given temperature as well as pressure.
Ready for a quote?
Tell us what you test and we will quote the rub tester, weights, heated weight or replacement parts you need.
Request a Quote